They're summarised beautifully by ALIEM here together with a good discussion on distracting injuries.
Showing posts with label trauma. Show all posts
Showing posts with label trauma. Show all posts
Saturday, 4 November 2017
Adult C-Spine Immobilisation
I think the RCEM guidelines say everything we need to know about adult c-spine immobilisation.
Thursday, 26 February 2015
FAST
I think I make FAST scanning more complicated than it needs to be. Four views - lungs are in eFAST, not FAST...although CEM has them on their checklist.
RUQ - Pouch of Rutherford-Morrison

- Start just anterior to the mid-axillary line, angled slightly backwards.
- Slide the probe towards the head to get a view of the diaphragm
- Look for pleural fluid - a jet black triange just above the diaphragm
- Ask the patient to take a deep breath if possible, particularly if rib shadows obscure the area of interest.
LUQ - Spleno-renal angle
- Posterior-axillary line at about the 6th to 9th intercostal space
- To get rid of rib shadows, and to get a better view of the spleen, slide the probe towarsd the hed and rotate it very slightly clockwise, producing an intercostal oblique view, so that the spleen (not the kidney) is seen.

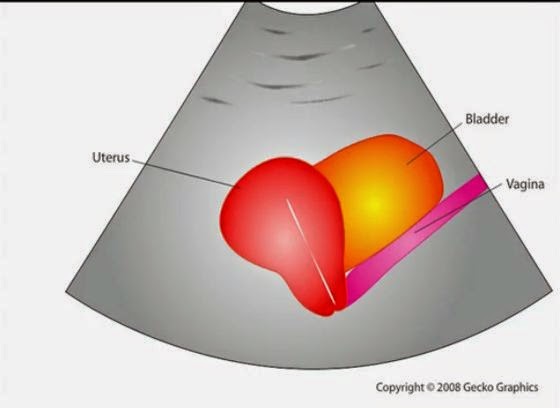
Pelvic - Pouch of Douglas in females, rectovesical pouch in male
Fluid will collect here.
Place the probe on the pubic bone and note a bone shadow. Slide slightly towards the head to get a good longitudinal pelvic view.
Full bladder will be triangular in shape.
In a female, the body of the uterus sits in the intraperitoneal space just posterior to the bladder (Figure 19), so free fluid will be seen just posterior to the uterus. This space is often called the pouch of Douglas and sometimes just small amounts can be detected

Cardiac
Subxiphoid view - probe laid almost flat and angled towards the head. Apply probe pressure to indent the epigastrium

Pitfalls
Perinephric fat, especially in obese patients, may be misinterpreted as intraperitoneal free fluid. Consider comparison views between each kidney.
Free fluid isn’t always blood; consider ascites, fluid related to a ruptured ovarian cyst, ruptured bladder or peritoneal dialysis.
90% sensitive and 99% specific for traumatic haemoperitoneum

References
Emergency Ultrasound Made Easy
http://www.trauma.org/index.php/main/article/214/
http://www.sonoguide.com/FAST.html
CEM Website
RUQ - Pouch of Rutherford-Morrison
- Start just anterior to the mid-axillary line, angled slightly backwards.
- Slide the probe towards the head to get a view of the diaphragm
- Look for pleural fluid - a jet black triange just above the diaphragm
- Ask the patient to take a deep breath if possible, particularly if rib shadows obscure the area of interest.
LUQ - Spleno-renal angle
- Posterior-axillary line at about the 6th to 9th intercostal space
- To get rid of rib shadows, and to get a better view of the spleen, slide the probe towarsd the hed and rotate it very slightly clockwise, producing an intercostal oblique view, so that the spleen (not the kidney) is seen.
Pelvic - Pouch of Douglas in females, rectovesical pouch in male
Fluid will collect here.
Place the probe on the pubic bone and note a bone shadow. Slide slightly towards the head to get a good longitudinal pelvic view.
Full bladder will be triangular in shape.
In a female, the body of the uterus sits in the intraperitoneal space just posterior to the bladder (Figure 19), so free fluid will be seen just posterior to the uterus. This space is often called the pouch of Douglas and sometimes just small amounts can be detected
Cardiac
Subxiphoid view - probe laid almost flat and angled towards the head. Apply probe pressure to indent the epigastrium
Pitfalls
Perinephric fat, especially in obese patients, may be misinterpreted as intraperitoneal free fluid. Consider comparison views between each kidney.
Free fluid isn’t always blood; consider ascites, fluid related to a ruptured ovarian cyst, ruptured bladder or peritoneal dialysis.
90% sensitive and 99% specific for traumatic haemoperitoneum
References
Emergency Ultrasound Made Easy
http://www.trauma.org/index.php/main/article/214/
http://www.sonoguide.com/FAST.html
CEM Website
Thursday, 15 January 2015
What did I learn from the ATLS instructor Course?
I had high hopes for the ATLS instructor course, and felt a little under-prepared and didn't really know what to expect. I learnt a lot, and thought I'd share some of my thoughts - in the hope that maybe other people can be better prepared.
Most importantly, ATLS as a course has a really bad reputation. I don't think it's all ATLS's fault - I think that a lot of it is the fault of the individual instructors. Why? Firstly - slides. You are allowed to omit slides, and add picture slides. You can't alter the text...but there's a lot you can do. Secondly - out of date information - actually, the book may have some of the "older" principles, but the course doesn't focus on them, and allows discussion as long as the principles of ATLS are met.
Preparation
I would suggest:
- Don't read all of the pre-course manual.
- Leave the instructor's manual in its shrink wrap. It's on the CD, and you can read it as a pdf and print off the relevant pages. Open the manual - and then you'll have to decide how to store it in a sensible fashion.
- Re-read the ATLS provider manual. It's there as a pdf on your CD. You need to know it to pass your MCQ - and although you do know it, you need to remind yourself of the "ATLS" way. The MCQs like the random things - like neuroanatomy.
Microteaching
- Plan and rehearse your microteaching.
- The timing is really important - 6 slides, 5 minutes. Title slide, objectives, question and summary = only really 2 slides!
- Interactivity - ask questions
- You can use your own slides or the ATLS slides. Either way make sure you know the slides.
Skill Stations
Prepare by reading the ATLS manual, and watching the DVD. This means you know the "perfect" technique. You don't need to teach the "perfect" technique but you do need to know it -as students will have learnt that. You can then explain why you are deviating from the norm.
You do launch straight into the skills station teaching so make sure it is prepared already.
Critiquing
Stick to Pendleton Plus. It's covered thoroughly in the course, so you should remember it well.
Moulages
You'll be told your moulage scenarios before the course. Take some time to read them. Make sure you bring the moulages + the critiquing form to the moulages.
I struggled a bit to remember everything with the moulages - in retrospect I would highlight the initial scenario (as you need to tell that to the candidate), then write yourself an outline of what happens eg. pneumothorax --> tension --> decompress --> still shocked --> responds to fluids.
Knowledge
There are three causes of error -
Ignorance --> fixed by lectures and skills
Ineptitude --> lazyness - fixed by human factors coaching
Necessary fallibility --> encourage everyone to talk about their errors
Further Reading
- View Sir Ken Robinson's TED talks
- ATLS Manual!
Subscribe to:
Posts (Atom)